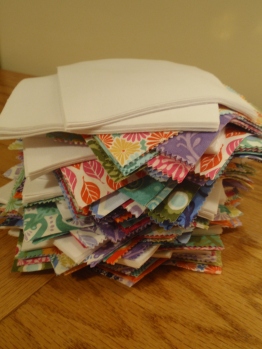
Whether you have a layer cake, charm packs or just a lot of scraps, this is a pattern for you. Twenty big blocks. One fun quilt!
This quilt premiered as a quiltalong, but I wanted to gather all the directions into one tutorial for your convenience.
SUPER STARS QUILT
84″ x 104″
MATERIALS
You need either:
1. layer cake–42 10″ squares, or
2. four coordinating 5″ charm packs (it really helps if they are in pairs–so you have two of each charm), or
3. 160 scrap cut 5″ squares. Again, it really helps if they are in pairs, at least two of each type of fabric. So, cut or raid your scrap box for 2 5″ squares of 80 different fabrics. This will give the coolest, genuine scrappy look. As soon as the quiltalong is over, I am making one of these.
You will also need background fabric, about 5-3/4 yards.
CONSTRUCTION
1. If you are using a layer cake, cut 40 of the 10″ squares into quarters, yielding 4 5″ squares from each. You will have two left over.
If you are using charm packs, put all of your charm packs in a pile. It really helps if you have two each of the identical charm pack.
If it is scrappy, raid your scrap bin and cut a lot–160 squares, again, ideally in groups of 2. That is 80 fabrics in all. Or, just make the closest matches you can–in pairs.
But, however you get there, you need 80 pairs of 5″ squares(160 squares in all).
2. Cut (some of) your background fabric into squares. There will be more cutting of this fabric when we assemble the quilt. But, for now you need to cut 80 5″ squares and 80 4-1/2″ squares. Set the rest of your background fabric aside. Clearly label it “Super Stars Quilt” so you don’t accidently cut it up for a different project next week. ![]()
3. Now we are ready for SORTING. This isn’t a big step, but it is an important one, and the last step before we get serious about sewing.
You need to sort your fabric into 10 piles. Each pile should contain
8 5″ background squares
8 4-1/2″ background squares
16 5″ print squares–2 each of 8 different fabrics, or very close matches.
As you create the piles of print squares, you want to keep color distribution in mind. As my colors are very bold, I wanted to make sure the colors were distributed as evenly as possible. Because I am a little obsessive, I created an 8-by-10 grid of color to try to keep a nice mix of color and pattern in each pile. You don’t have to be this picky about it. But, just looking at fabric makes me happy, so I actually enjoy this process.
If you do not have a safe place to put your piles, you might want to get 10 ziplock bags or other storage item and put the piles in there. Label the bags Super Stars Quilt, or you might accidently use the fabric for something else. Put the bags, or safe piles, with your leftover background fabric.
4. When you are ready to sew, get one of your sorted stacks. Set aside the 4-1/2″ squares. They will get their turn shortly.
5. Take the colored squares and arrange them in a circle. Make sure you have nice color distribution and like the look of each color next to the other. This was my original idea, but later on I switched two of the colors because it was too red-orange on one side and too blue-purple on the other, but this gives you the idea.
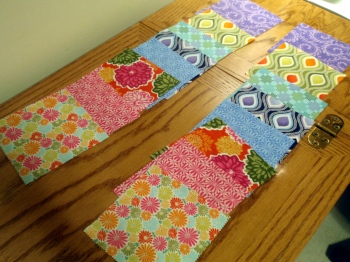
6. Take the fabric from the circle and lay it in two straight lines starting with Fabric 1. In this picture, the floral at the bottom is number 1.
Now is the color arrangement issue more obvious? It was to me, so I changed things up a bit.
Ah, much better. Ultimately, it probably doesn’t really matter. As far as I can tell, every block is going to look great in the end, so don’t stress about it, just think about it a little bit.
7. Using the top row, take each fabric and sew it to a 5″ back ground square to make Half Square Triangles (HST). I like to use the draw-a-diagonal-line-and-stitch-on-both-sides method. For a full explanation of this technique, check out THIS tutorial. She does a great job. When finished you will have 16 HST.
8. In the bottom row, take each fabric and stitch to the one next to it–match up 1 and 2, 3 and 4, 5 and 6, 7 and 8. You will again make HST. When finished you will have 8 HST.
9. Square up. Yes, I know noone really likes to do this, but it makes such a difference in the results, particularly if you are using precut fabric, which never is exactly-precisely cut. You might have noticed a fringe of the colored fabric peeking out behind the background square in the picture above. Now you know why I wasn’t worried about it. Squaring up is your friend. ![]() You don’t need a 4-1/2″ ruler, but, if you happen to have one, it is really nice. This one came free with a batting purchase.
You don’t need a 4-1/2″ ruler, but, if you happen to have one, it is really nice. This one came free with a batting purchase.
10. Separate the HST into two matching sets. In each set you will have four color-color HST and 8 color-background HST. Add 4 4-1/2″ background squares to each set. I should have a picture here. Sorry.
Using one set, lay out the pieces to create a faux-Lemoyne star. The center is a pinwheel shape and then the background-color HST form the points. Notice those 4-1/2″ squares have their turn in the corners.
11. Assemble block.
12. Do it again with the other set. Yes, this is a two-for-one deal! When you compare the two blocks you will see the color arrangement isn’t exactly the same. It is fun to try different combinations.
13. Ta-dah! You have two beautiful Super Stars blocks. We are going to do this 10 times to create 20 blocks.
15. Lay out your 20 blocks in a 4 wide and 5 long pattern. You can use the picture as a reference. It probably doesn’t matter too much, but I do like to check that identical prints aren’t touching and that I don’t end up with big color blobs accidently.
16. Assemble each of the five rows using your 4-1/2″ x 16-1/2″ rectangles as sashing in between. Each row will use 5 rectangles. Take the time to iron. I like to iron away from the colored stars because it seems to be easier than folding all that piecing back on itself and adding bulk. That means that the seam allowances on the rows all point towards the sashing.
17. Build sashing strips for between the rows. Each strip will start and end with a 4-1/2″ x 4-1/2″ square and then alternating 4-1/2″ x 16-1/2″ rectangles and squares in between. You will build 6 strips. On these strips, I iron all seam allowances away from the squares towards the rectangles. This will make the sashing nest with the rows when you do the final assembly.
18. Finally, you have only 10 long seams to go. Sew the sashing strips to the colored star rows. Again, ironing is very important. I iron after each seam. Otherwise, it is a lot to handle at the end.
19. Ta-Dah! You have a finished top. Large enough for a queen size bed. Simple, but bright and happy! Enjoy!


Thanks! I did the print-friendly thing, which never matches the pictures up right, but at least it’s all in one document!
Thank you once again for sharing. I love this quilt. I wonder if I could turn this one into a Quilts for Comfort project using up what I have once again? I also need to make a wedding present quilt perhaps this would be a good one. You’re inspiring me more than you know.
This quilt turned out so pretty. Thanks for sharing with us.
I love it and can hardly wait to do mine…your tutorials are so good and easy to read…thanks…
This has always been a fave of mine and yours is so much fun!
Thank you very much.
Thank you ..Now I can print it out in 1 section.. Again Thank you.
What a great pattern!
What a lovely and FUN quilt!
Beautiful!!! But looks a lot more advanced than I am.
I always look for quilt patterns that I can make for our Wounded Warriors. With 4 1/2″ blocks and unfinished 16 1/2″ block this will be one of my quilts I make for them. Thanks for the pattern!! Sandy
The pattern is reminiscent of the 1930s quilts I love So clean and uncomplicated.
I can’t wait to start 3 different quilts from these. Thank you OH so much.
I just found your blog and tutorial last week! I cut out the pieces for the quilt and started it today! Just finished the first star, it is beautiful and I can’t wait to see it completed! Thanks for the Great tutorial!
Hi,
I found this pattern less than a week ago. Am stitching the sashing.
Btw I live in Australia. Great easy pattern and I only had 2 charm packs, so only making 9 blocks. It will still be a good sized quilt.
Thank you, Pauline Thoman
I have just looked at your beautiful super star quilt and was wondering if it could be made with just. 4 colours I need to make a quilt for young lady that is turning 21 and her favourite colours are black, white and red .
Thanks Ann