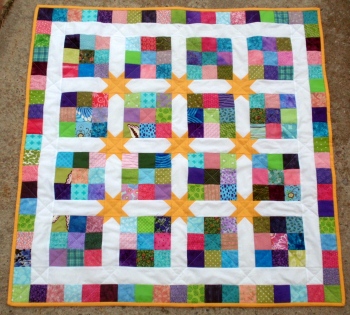
Starring Baby Quilt
38-1/2″ x 38-1/2″
This postage stamp variation uses your scraps or precut squares. You can also separate a jelly roll into colorways (or not) and create three of these sweet quilts. Good for babies or wall hanging or table topper. What about a patriotic one?
If you wanted a larger throw, change the plan to include 25 nine patches and 16 stars. Your final size will be 46-ish inches square.
MATERIALS
216 2-1/2″ squares. I selected my colors by coordinating with the backing fabric. There are four color groupings in the scrappy squares: green, purple, pink and blue. That saved the gold/yellow for the stars and binding. There is a wide range of colors in each grouping. Remember that it is easier to match 10 blues than two of them. Twenty is even easier.
1/2 yard background fabric (white here)
1/2 yard for stars and binding (yellow here). It helps the quilt to “work” if the stars and binding are the same color. The binding then doubles as a very narrow border and ties the quilt together.
1-1/8 yard for backing
CUTTING DIRECTIONS
1. Sort or cut from scrap 216 2-1/2″ squares.
2. From background fabric cut 24 2-1/2″ x 6-1/2″ strips for sashing, 4 2-1/2″ squares for border, 4 2-1/2″ x 30-1/2″ strips for border.
3. From star fabric cut 4 WOF strips for binding. I used 2-1/2″ to give a wider look. You also need 9 2-1/2″ squares and 72 1-1/2″ squares.
CONSTRUCTION
A few tips: 1. Press. A lot. It really makes sewing easier. Fabric is obedient. Tell it what you want it to do and it will usually do it. 2. Take your time when joining up the long pieces. Line up the seam allowances to one another. You aren’t really sewing long pieces, but short pieces joined together. Take advantage of that. It will help keep the quilt square.
Now, let’s get started!
1. Create 16 9-patches from the 2-1/2″ squares. I like to sort my colors evenly, but not obsessively. 🙂
2. With the remaining 2-1/2″ squares create four strips for the outer border. Two should be 17 squares each. Two should be 19 squares each. All done with those happy scrappy squares.
3. Using 12 2-1/2″ x 6-1/2″ background sashing strips and 48 of the 1-1/2″ star fabric squares, create the points for the stars. Do this positioning the colored square in the corner of the background piece.
Stitch across the diagonal.
It will look like this.
Trim off the outside edge, leaving a 1/4″ seam allowance.
Press open. There is generally less distortion if you press it closed in place, then press it open. Don’t really know why it works, but it does.
Repeat three more times until all four corners have points.
Repeat 11 times, so all twelve sashing pieces are equally decorated with points.
4. Using 12 of your 2-1/2″ x 6-1/2″ background sashing strips and 24 of the 1-1/2″ star fabric squares, create the points for the stars as above. You will only put 2 squares on these strips, both on one end. These are the outside sashing pieces for the stars.
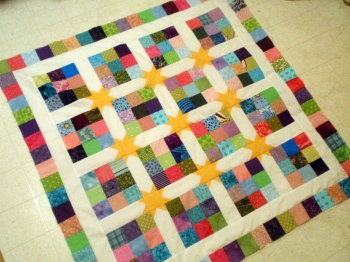
5. Lay out the quilt as shown using 16 nine patches, the 24 sashing strips and the 9 star fabric 2-1/2″ squares.
6. Assemble your quilt top. I prefer building rows and then joining those to one another.
7. Build the outer row of white sashing. Attach two of the 2-1/2″ x 30-1/2″ background sashing pieces to the sides of the quilt top. Attach the 4 2-1/2″ background squares to the ends of the other two 2-1/2″ x 30-1/2″ background sashing pieces. Sew these to the top and bottom of the quilt top.
8. Using the colored square strips you created earlier, attach a 17 square strip to the sides of your quilt. Attach the 19 square pieces to the top and bottom of your quilt. You have a finished top!
9. Sandwich, quilt, bind and label as desired. I used a simple diagonal crosshatch through the centers of the stars and continued through the rest of the quilt. That gave me about a 6″ interval on the quilting. You could easily make the crosshatch tighter or choose something else that suits you.
10. Ta-dah! A Starring Baby Quilt of your very own.
STARRING BABY GALLERY
Here’s Julie’s!
…your beautiful creation HERE!


Thanks for the tutorial and it is a truly lovely quilt.
I looked at this one and thought how pretty, but how difficult it must be for someone just starting to quilt. Then I went through your instructions and changed my mind. I believe it sure be fairly simple if I follow your good instructions. Thanks
Thank you for your time in creating this tutorial, I love this fun quilt and have saved it for future baby quilts.
I love it and will make a throw using your measurements..i have gone thru my 2.5″ squares to make my grand daughter her queen size quilt..she wanted darks so there are lots of lights left..first I want to find a back so I can match it like you did..i love it..hope to get to it in a month or so when my grand daughter’s quilt top is done..thanks for the great tutorial..you always make them so clear..
Thank you for the tutorial. You step by step instructions are very easy to follow. I will definitely make this one!
I really like this too! I can see it making a great Christmas table topper. Thanks for taking the time to do the tutorial; you explain things very well!
what a great idea!!! with the stars on there it would be beautiful..i still have the Christmas fabric out …hmmm will have to think about that…
I just love this one. It may be the one one I jump back into the waters with:). Been down for quite a long time, so getting ready to “get back at it” 🙂
Great little scrap quilt. Great tutorial. Thanks 🙂
Super! This is just in time. My 2.5″ squares shoebox runneth over again! And Bambi will be needing quilts. =)
Always fun to see a new tutorial from you. Thanks for taking the time to share with us.
Perfect timing! I have an abundance of left-over brightly coloured squares and a new granddaughter who needs a play quilt. Thanks!
Oh, I’m going straight to my flannel stash of leftovers and doing this! I have made baby quilts for all my young grandkids, but it would be nice to have one here at the house for when they come for those holiday visits. I always have my ratty old baby blankets from when my kids were young (long long before I began quilting), so I need a baby quilt of my very own! Thanks for the great tutorial!
Beautiful.Love it!
Thank you for sharing.
It’s beautiful and so simple to make the stars.
I must say that when I looked at the picture, I was not impressed at what looked like a white lattice with yellow X’s on it. I had made the Twinkle Star and Irish Chain Star quilts and loved them, so I finally tried this one. I love it! The picture does not do it justice. As a matter of fact, I am just finishing up a second one for another little one. I love your star quilts, and this one is lovely.