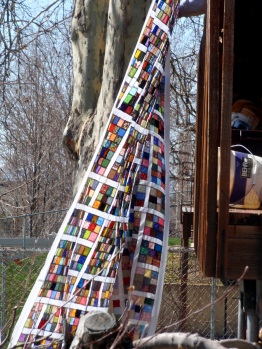
One, three, five, seven, nine…all those numbers are in there. I guess we all grow up a little odd one way or another, but this quilt is just full of odd numbers. Hopefully, it will be a charming sort of odd that you will enjoy as much as I have.
GROWING UP ODD
90″ x 90″
MATERIALS
Approximately 2500 2″ squares cut from all the scraps you can find. The exact number is 2425, but who’s counting?
3-1/4 yards background fabric
backing (7 yards)
batting (at least 100″ square)
binding (3/4 yard, if you use 2-1/4″ width)
CUTTING DIRECTIONS
Well, by the time you get to this point you will already have done the hard part and cut all those little squares. By the way, you have just saved 6-3/4 yards of fabric from waste. Don’t you feel thrifty and clever?!
Background fabric–
1. to build the blocks you need 75 2″x5″ rectangles, 25 2″x2″ squares, 50 2″x11″ rectangles.
2. to build the sashing you need 40 2″x17″ rectangles, 16 2″x2″ squares.
3. to build the borders you need 2 2″x87-1/2″ rectangles (made using 2″ WOF, joined), and 2 2″x90-1/2″ rectangles (made using 2″ WOF, joined).
CONSTRUCTION
1. Using the 2″ scrap squares, build 75 9-patches.
2. Using the 2″ scrap squares, build 25 blocks 3-by-7 (21 squares each).
3. Using the 2″ scrap squares, build 25 bocks 7-by-7 (49 squares each).
4. Assemble into larger blocks. You need 3 9-patches, 1 3-by-7 patch, 1 7-by-7 patch. Also, background fabric: 3 2″x5″ rectangles, 1 2″x2″ square, 2 2″x11″ rectangles. Lay out as shown.
I assemble the row of 9 patches first, then the sashing row, then the larger blocks with sashing. Then sew my three “rows” together. Press. A lot. You won’t regret it.
5. Repeat step four a total of 25 times.
6. Lay out the assembled blocks. I rotated each block 90-degrees right compared to the one next to it. It gives is a sort of cobblestone look. I like the variation. This isn’t a hard-and-fast rule. Just play around until you like the look of it.
7. While that rests and you make adjustments every time you walk by, make the sashing between the blocks. You will use 5 2″x17″ rectangles and 16 2″ squares. Alternate the rectangles and squares. Repeat four times to create the strips that will go between the rows.
8. Using the remainder of the 2″x17″ rectangles, assemble the block rows. Each row will alternate five blocks and four rectangles. More pressing!
9. Sew the rows and strips together to make the body of the quilt.
10. Add the border by attaching the 2″x87-1/2″ rectangles to the sides and the 2″x90-1/2″ rectangles to the top and bottom and pressing a lot more. You have an assembled top.
8. Sandwich, quilt, bind and label as desired.
NOTE: I was in such a rush to share this with you that I haven’t completed those steps yet, but will update once the job is complete.
9. Ta-dah! You have completed a Growing Up Odd Quilt. Yay you!
GROWING UP ODD GALLERY
Maxine made this beauty for her great-nephew.
Mary in Michigan finished this lovely top.

…your beautiful creation HERE!


Love this quilt—–must take the prize for most squares used in one quilt. Beautiful.
Sent from my iPad
>
i love it…will start sewing the blocks together as leader/enders on another quilt i am finishing up…will see if i have enough for the sashing and borders…i think i do…thanks for the tutorial…
I have a lot of small scraps and this would sure use them up. Thanks for the tutorial.
Another fun quilt! We’ll see what one is in progress whenever I get enough squares cut.
I LOVE that top! It looks so pretty hanging out like that. Even a small one for babies would be great. Thanks for all the work you put into making a great tutorial!
don’t think I will be doing this one. Have 7 to finish now. But it is very colorful.
LOVE it!!!!!
My kind of quilt, LOVE it. As Merrie said it would be great leadres/enders project. Thanks for great tutorial
Wow, I just love this – and it would make a great leader/ender project!
Love this quilt….can’t wait to try it. Like the leaders and enders idea as well!
This quilt is just like the rest of your projects – FANTASTIC! Thank you for sharing your wonderful ideas!
Thank you for another great tutorial. 2″ square?, not my preferred size. But why not. I might just give it a try. I LOVE the quilt, so I will have to start cutting 2″ squares as well as my normal sizes I cut with my scraps.
Beautiful! I just happen to have a big jar of “ugly” fabrics that I cut to make something beautiful like this! Thank you!!!
Looks great. Wish I had the patience for 2 inch squares.
Yay – this is such a great idea!!! you come up with the best scrap usage of anyone I know!
That is an absolutely beautiful quilt.! 🙂
Thanks for stopping by to visit tonight. Those flying geese units you saw on my World of Small Stars finish at 0.75″ x 1.5″ — yikes! 🙂
I really like this quilt and have bookmarked the tute. Thanks for sharing! I see myself strip piecing using some scrappy strips I have a large box of.
Well I did it. What a marathon. I finished my top yesterday only doing 4 x 4 block layout. I started on Sunday after cutting late last week. I just love it. Thank you so much. I have been piecing leftover squares into quilted bags. I have enough squares left to make 33 nine patch blocks which I may incorporate into the back. Along with a full block which I was sure I had made and couldn’t find it. I thought I mustn’t have made it and made another. And of course as soon as I did that I found it.
It’s gorgeous!
Fabulous! Time to start cutting my 2-inchies….love scrappy quilts…thanks for the great tutorial!!!!
Must you use a square with the long sashing? I’m thinking….one less peice to match.Lazy, eh? I ,too, love your scrappie tutorials. Thanks so much.
I posted a picture of my finished quilt today. My great nephew loves it. It was a fun pattern. Thank you for all of your tutorials.
http://maxinegiveaways.blogspot.com/2014/10/growing-up-odd-quilt-finish.html
Reblogged this on Roseinmn's Blog and commented:
what fun and constructive activities, also creative, building quilts for loved ones,veterans,fire victims or new moms.So many easy but unique versions!
oh my!
2″” squares, you must be somewhat crazy! Seriously, I love this scrap quilt!
my Sunday afternoon project..while making sure my son studies for exams. .. 25 piles x 100 ..here I go!!!!!!!!!!
Started this yesterday with two students that have never sewn before..quite an experience for them..they are now over the fear of the rotary cutters and the sewing machine..thank you for posting this quilt..
Love this quilt, my friend made 2 with 2″ squares, I made mine with 2 1/2″ squares…not recommended unless you need a ginormous quilt. They all turned out really well, my friend made one with white background and one with muslin. The one with muslin background looks very soft and old fashioned looking..all are gorgeous.
I have started the process of sewing all my scraps together. I am doing 2.5 inch squares but will do 3 blocks across and 4 blocks long. I was wondering if that little single 2 inch block is necessary in the sashing or could I not just use one long strip….of course my sashing strips are all 2.5 inches wide. It looks amazing and I can’t wait to sew them together.
Your quilt sounds beautiful. Hmmm…maybe I will have to try a 2-1/2″ version, too…
The little squares in the sashing helps to make the blocks really line up precisely. When I am working on a small scale and with exact squares, I like the overall look to be equally exact You might try sewing one strip together with a long piece and see how it looks to you and then decide if you feel the small blocks are necessary. Let me know what you decide, please.
Thank you for this tutorial. I just finished a colorful quilt of Growing Up Odd blocks and posted a picture on my blog sewcookandtravel.blogspot.com.
My granddaughter wants it : )