
Twinkle Baby Quilt

34-1/2″ x 34-1/2″
Time to use up some more scraps and put a twinkle into at least three sets of eyes: yours, the mama and the baby!
MATERIALS

208 scrappy 2-1/2″ squares. As has become customary when I create baby quilts, I selected colors that coordinate with the backing fabric. There is a wide range of colors in each grouping. Don’t be too matchy-matchy. Variety keeps babies from being bored. No one wants a bored baby!
9 2-1/2″ squares for the center of the stars
72 1-1/2″ squares for the points of the stars. I used 8 in each color grouping to match the 9 2-1/2″ squares above.
72 2-1/2″ squares background fabric (white here). This is more than 1/3 yard, but less than 1/2 yard
1/4 yard for binding
1-1/8 yard for backing
CUTTING DIRECTIONS
1. Sort or cut from scrap 208 2-1/2″ squares.
2. From background fabric cut 72 2-1/2″ squares
3. Gather up your 9 2-1/2″ squares for the center of the stars and the 72 1-1/2″ squares for the points. NOTE: Each of my point fabrics is different. This gives the twinkle look.
CONSTRUCTION
A few tips: 1. Press. A lot. It really makes sewing easier. Fabric is obedient. Tell it what you want it to do and it will usually do it. 2. Take your time when joining up the long pieces. Line up the seam allowances to one another. You aren’t really sewing long pieces, but short pieces joined together. Take advantage of that. It will help keep the quilt square.
Now, let’s get started!
1. Create 16 4-patches from the 2-1/2″ squares. I like to sort my colors evenly, but not obsessively. ![]()

2. Create 24 6-patches (2 x 3) from the 2-1/2″ squares. NOTE: Yes, you could make long strips of squares for the sashing, but blocks are easier to move around, insuring that matching colors don’t group together. It helps me balance colors.

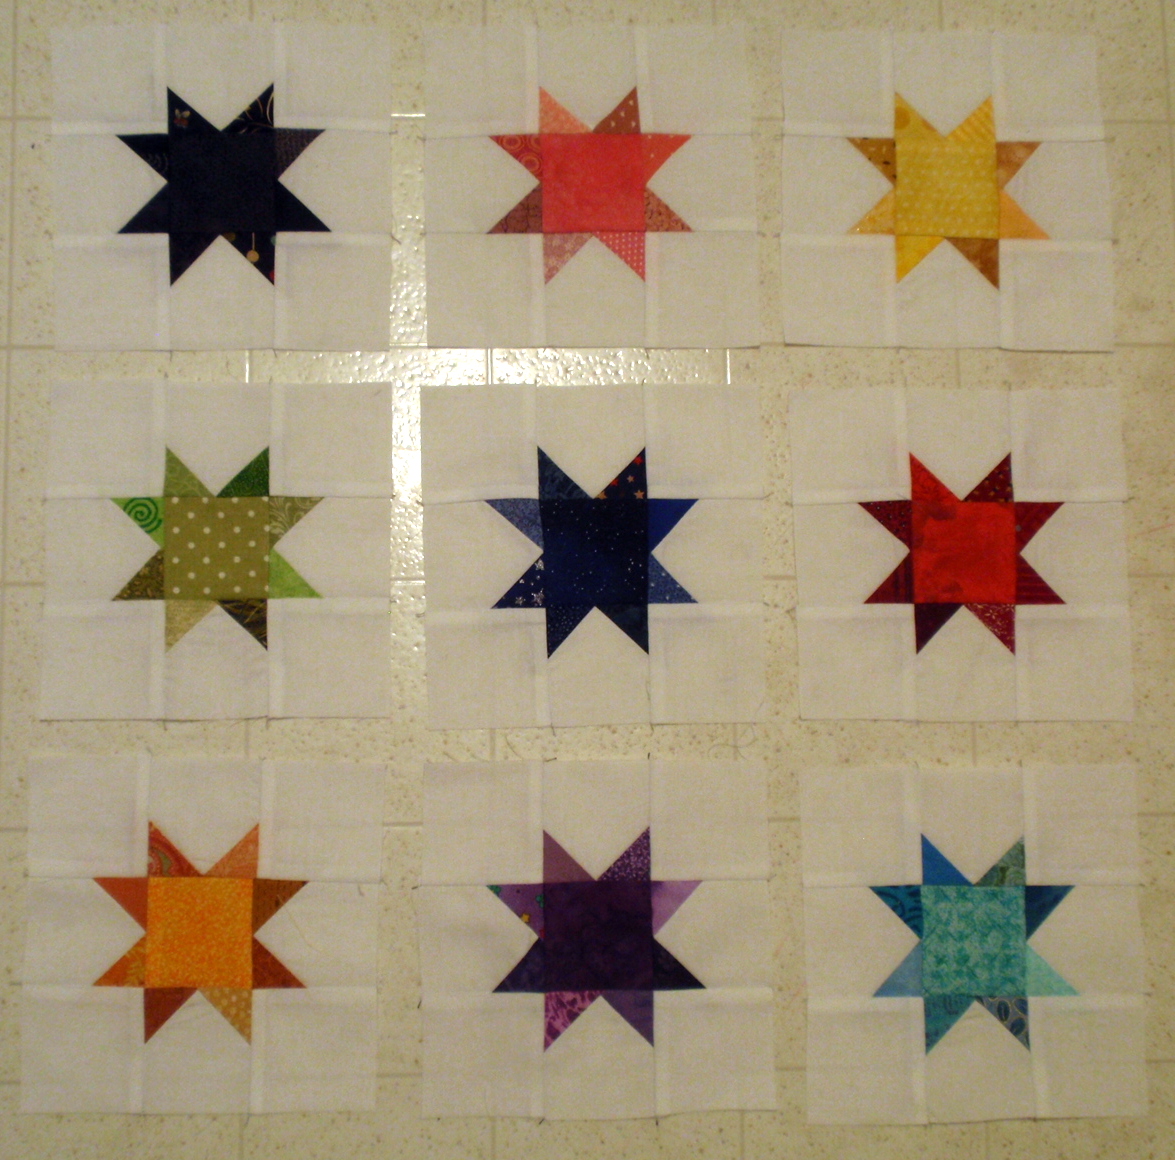
3. Using 4 2-1/2″ background squares and 8 of the 1-1/2″ star fabric squares, create the points for one of the stars.

Do this by positioning the colored square in the corner of the background piece.

Stitch across the diagonal.

Trim off the outside edge, leaving a 1/4″ seam allowance.

Press open. There is generally less distortion if you press it closed in place, then press it open. Don’t really know why it works, but it does.

Repeat so the adjacent corner of the square also has a point. This is one side of your star.

Repeat three more times so you have points for all sides of the center square.
Assemble as typical for a 9 patch using one center square, the four squares you just created with small points, and four plain background squares.

You have a star.

4. Repeat 8 more times to create all the twinkle stars.
5. Lay out the quilt using the 16 4-patches, 24 6-patches and nine stars. (Sorry, no picture of this step).
6. Assemble into rows, the sew the rows to one another.
7. A completed top!
8. Sandwich, quilt, bind and label as desired. I used a simple diagonal crosshatch. You could easily choose something else that suits you.

9. Ta-dah! You have completed a Twinkle Baby Quilt. Yay you!
TWINKLE BABY GALLERY
Here’s Patricia’s for her baby grandchild…

Here’s Nora’s…

and Julie’s…

and Leslie’s…

Ann in the UK shared this picture. Notice her careful color coordination of stars and surrounding scrappy squares.

…your beautiful creation HERE!

Great tutorial and love the idea of using up the scraps. I just cut up all my scraps into “usable pieces” and was think what in the world am I going to do with it all. This is a nice pattern. I love your method for your star points. So much easier than a lot of other ways I have done them. Thanks.
Reblogged this on stitchinggrandma and commented:
Remember those scraps and the scrap storage system? Well, here is a good use for all those little blocks!! A great scrappy baby quilt! Thanks to Wedding Dress Blue for a great tutorial!
I “re-blogged” this post, it is such a great use of the scraps!! 🙂
Wow, the patience you must have!!! This is really lovely!
I love it and fully intend to make a lap robe out of it…don’t need a baby quilt right now..and I think I might have almost enough 2.5″ squares left..just made my grand daughter a quilt using hundreds of them but she only wanted darker ones and I have all the light colored ones left so it will be light colored..thank you so much for the tutorial ….as usual your tutorial is excellent!!!!!
Beautiful. Thanks for sharing.
This pattern will be great for NICU quilts for Project Linus. Thanks!
Thank you for this tutorial! I love scrappy projects and I’m looking forward to diving into this one. As soon as I finish up some UFOs.
Amazing! I love the pattern design, great job!
What a beautiful quilt!!! I love the combination of the star blocks with the squares. Great for using up scraps, too.
Hi Deanna, I’ve featured your quilt today…
http://www.threadingmyway.com/2014/02/threading-your-way-features_24.html
I just love it! thanks for the tutorial 🙂
I especially love this quilt; everything about it! Baby quilts are my favorites. And there are always plenty of babies and mama’s out there that could use a quilt, and the love and care that they signify. So thank you so much for sharing.
This is one of my favorites!
I loved this pattern and have just finished my quilt – I’d like to share it … can I email you a picture
Dear Deanna!
Looking for a pattern for a baby quilt I found jour wonderful tutorial! I love it- and now my goddaughter`s first son gets a Twinkle Baby Quilt! In these exceptional times it will bring some joy to the young family.
Best wishes from Germany, stay healthy! Susanne