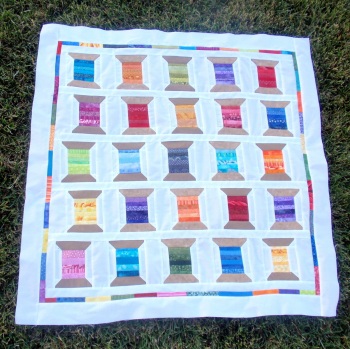
This quilt will use the narrowest strips of scraps you can’t bear to throw away. Dig out that bag or box of skinnies and make a sewing treasure.
SPOOL SHUFFLE QUILT
36″ x 36″
MATERIALS
scraps–some at least 1″ wide and 3-1/2″ long. Get out that bag or box of skinnies
2/3 yard for spool bodies and binding (here brown)
1-1/2 yard background (here white)
1-1/8 yard backing
batting at least 40″ x 40″
CUTTING DIRECTIONS
1. Set aside a bunch of skinny scraps at least 3-1/2″ wide. You might want to sort by color. If you are cutting, 6 pieces 1″x 3-1/2″ will nearly exactly make the “thread” part of each block.
2. Set aside a bunch of skinny scraps 1″ wide. Enough to make 130″ for the narrow colored border.
3. Cut 50 rectangles 1-1/2″x 4-1/2″ for the spool bodies. They can be all one color, or, here I used two different browns to give subtle variation and interest.
4. From background cut: 100 squares 1-1/4″ x 1-1/4″ (stitch and flip on the spool bodies), 50 rectangles 1-1/4″ x 3-1/2″ (sides of the spools), 5 rectangles 1-1/2″ x 5-1/2″ (sashing), 25 rectangles 2-1/2″ x 5-1/2″ (sashing), 6 strips 1-1/2″ x 31-1/2″ (sashing), 2 strips 2-1/2″ x 32-1/2″ (outer border), 2 strips 2-1/2″ x 36-1/2″ (outer border).
CONSTRUCTION
1. Let’s make the spool blocks first! I sorted my scraps by color, deciding what the colors would be as I went along, but you could also do one to match your sewing room, or in significant colors for a special someone, or, and I really want to try this some day, a monochromatic one that shades from lightest to darkest scraps–wouldn’t that be striking?!
The scraps need to be small strips at least 5/8″ wide and 3-1/2″ long. I used mostly straight cut strips, but angled ones would give a desirable wonky effect. I also settled on mostly strips about 1″ wide. Six such strips make a good block.
For each spool block you will need your colored strips, two 1-1/2″x 4-1/2″ rectangles (brown), four squares 1-1/4″ x 1-1/4″ (background), two rectangles 1-1/4″ x 3-1/2″ (background).
2. Stitch together enough small strips to make a section at least 3-1/2″ x 3-1/2″. I give a little extra wiggle room on the width because your ends might not match up exactly and this allows you to trim the block square.
3. Square up the block to 3″ wide by 3-1/2″ tall. This will be the thread section of your spool block.
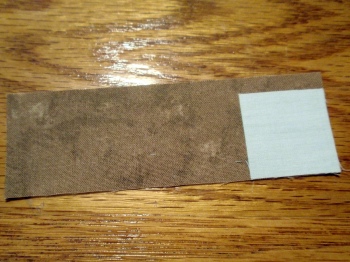
4. Using a 1-1/2″x 4-1/2″ rectangle and two 1-1/4″ x 1-1/4″ squares, put the squares on the corners of the rectangle as shown, one on each end.
5. Stitch along the diagonal
6. Trim off the outer corners 1/4″ away from the stitching.
7. Iron open.
8. Repeat for the other half of your spool body.
9. Using two 1-1/4″ x 3-1/2″ rectangles and your colored spool body, stitch one rectangle to each side of the spool. Press open. Stitch the prepared spool ends made above to the top and bottom of the spool body. Press open.
10. Ta-dah! You have made a darling spool block. It should be 4-1/2″ wide and 5-1/2″ tall.
11. Repeat 25 times. I had such a good time sorting fabric and playing with color. If you look closely at the quilt you will see, for instance, that there are three green blocks, but they are different greens. One limey, one mossy and one more up-the-middle hunter green. The blues are similar in their differences. I enjoyed the challenge of matching-without-matching. Enjoy yourself. Quilting is supposed to be FUN!
12. After you finish the blocks, have a really good time sorting and arranging all those beautiful gems. Once you have a 5 x 5 arrangement that pleases you, it is time to join them up.
13. Each row requires one 1-1/2″ x 5-1/2″ rectangle and five 2-1/2″ x 5-1/2″ rectangles of background fabric. These are your sashing. Starting with the narrow background rectangle on the left, alternate background and blocks, ending with a wider piece of background on the right.
14. The next row should be the opposite layout. Again you will need one 1-1/2″ x 5-1/2″ rectangle and five 2-1/2″ x 5-1/2″ rectangles of background fabric, but this time start with a wide piece and end with a narrow one. Alternate assembly order each row. This is what makes the spools shuffle in the end. Hopefully the pictures help to make this step clear. I am also open to suggestions.
15. Using the six strips of background 1-1/2″ x 31-1/2″, join the rows to assemble the top, with a strip top and bottom and between each row. I intentionally made these strips one long piece to further the offset appearance of the blocks. More shuffle! You may, however, want to sew each time for the opposite direction to keep the entire top square and not distort it.
16. Time to make the scrappy border. Using scraps 1″ wide and a few inches long, sew together enough to make two strips 1″ x 31-1/2″ and two strips 1″ x 32-1/2″.
17. Attach the two shorter pieces to top and bottom and the two longer pieces to the sides.
18. Time for the final border. Using the background strips 2-1/2″ x 32-1/2″ and 2-1/2″ x 36-1/2″, attach the shorter pieces to the sides and the longer pieces to the top and bottom.
19. Ta-dah! You have finished a Spool Shuffle Quilt top. Isn’t it darling!
ps–See that yellow “used” spool in the lower right? It was my ugly orphan block. I just recut the spool body and used it anyway. If you want to imitate the look, the body decreases to 2-1/2″ wide and the background strips increase to 1-1/2″ wide on that block. Sneaky me!
SPOOL SHUFFLE GALLERY
…your beautiful creation HERE!


Great tutorial, very understandable and followable, if that’s a word. =) I love the way this came out, but I might make bigger blocks. I throw away anything that is smaller than 1″. =)
I just love your spool block- I’ve seen some that were downright ugly and misshapen. I’m going to bring some scraps to my next retreat and do this! Thanks for the pattern and the inspiration!
Thank you so much for this great tutorial. I want to get started on this today! My scraps are all colors, sizes & shapes so they will be perfect for this.
I just made a block for fun. So cute but could you check the SASHING requirements? Just a guess but shouldn’t it read 5- 2 1/2 X 5 1/2 strips not 1 1/2 X 5 1/2? Sorry, not a criticism, just don’t want to cut it wrong….
For each row you need one 1-1/2×5-1/2 and five 2-1/2×5-1/2. I have corrected the cutting directions. Thank you.
Thanks for the tutorial! Great idea – might make something similar for my mum once I’ve built up enough scraps!
beautiful! It’s gonna be perfect to decorate my workshop ^^
Not looking! not looooking!!!!!
School holidays here at the moment, Granddaughters most days. Lots of cinema mornings, parks and an animal nursery farm today. Tomorrow Miss E and I are off to Brisbane for some quality time before school resumes next week. Maybe a patchwork shop or two will get a visit.
My oldest daughter and my granddaughter and my oldest granddaughter from daughter 2 are coming up for the day Sunday. 2nd granddaughter from no 2 is 17 on Friday(up here for the holidays with her dad) so we will be celebrating. Looking forward to that. But I will definitely put this mini on my list to do. All spare time this week I have been making a multi zippered bag.
This adorable! Thank you for sharing the pattern. I found you from Quilt Story.
Lovely quilt and great use of all of those scraps pieces I just can’t throw away! I have pinned this and hope it will be higher up the list than project number 115!
Thank you soooooo much for this Grrrreat Tutorial!!! Thank you for sharing with us!!! So excited to make one!!!
Ohio Hugs! & Lots of Special Blessings!!!
Lori 🙂
This is a nice size for a baby quilt, thank you for the inspiration!
Loved making your spool quilt! Thank you for sharing your creative genius. I used my vintage Feedsack scraps and posted it on Instagram. Love your blog. 😍 Lu
I’ve always loved the Spools block, but not so much the ways they are usually set together. However! Your setting of the Spools is so clever and charming — I’m totally in love with it!
Thank you so very much for sharing this!!
And, btw, thank you for always having pdf d/l available for your patterns. Makes it much easier to actually make them — now or when I can get to them on my to-make list. Truly appreciate that big bit of thoughtfulness.
Thank you for the wonderful tutorial. My spools were made about five years ago and tucked away while I worked on other items. I pulled the blocks out this weekend and put the quilt together. I am delighted at how cheery the quilt looks with the shuffled spools. It is a good feeling to have this quilt completed and up for show. Thanks again for sharing your pattern.
May I have permission to share this with a group of quilters? We do quilt block swaps and this is perfect for the group. Thank you Debra Gaynor