Friend Cheri shares her leftovers with me from time to time. It is always exciting to get a new bag of possibilities.
Sort and straighten and ask, “What do you want to be?”
Somehow, I was seeing stars. And that gave me a place to start.
I added a few fabric scraps from stash and adjusted as I went along. I don’t know how I would write a pattern, or even a tutorial for something like this. It is an interesting process, though. A discovery every step of the way.
And the, Ta-dah! A quilt!
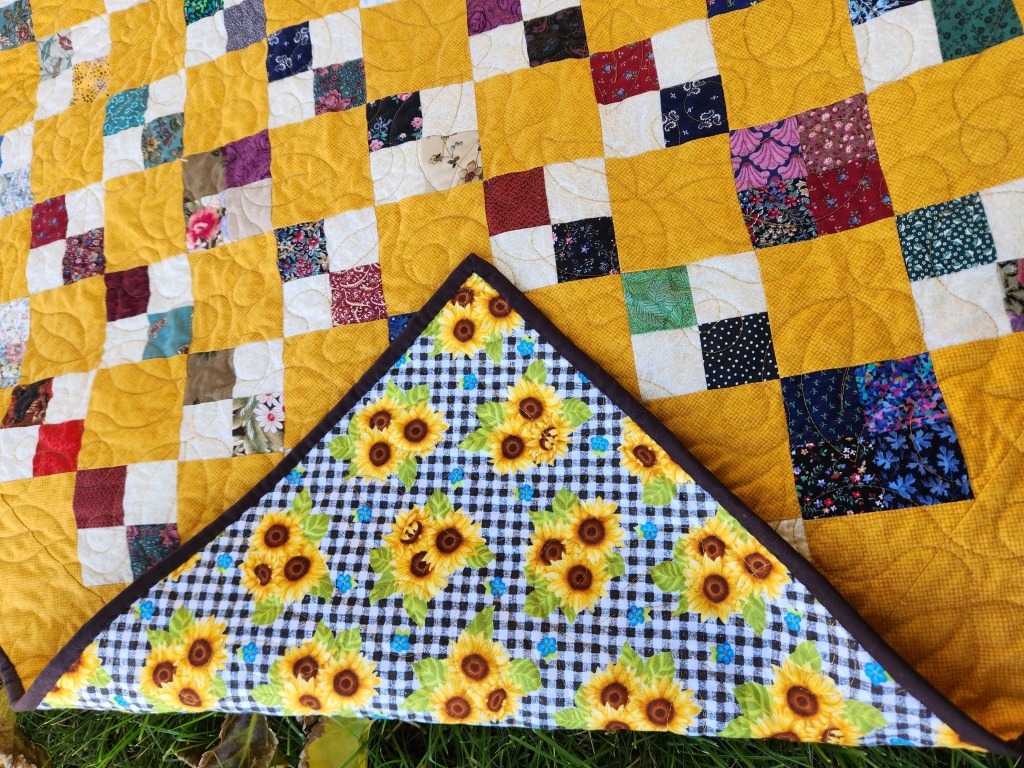
Finished size is 33″ x 38″. It has been gifted to a co-worked expecting a baby girl soon.
You know by now how these things get started: someone gives me something. In this case, as part of a larger bundle of possibilities, there were three matching 6-1/2″ applique hearts. Much too cute to trash. I did consider pot holders, or a table runner, or a banner. But what they wanted to be was a baby quilt.
I had a little bundle of fat eights that “happened” to match perfectly. I love it when that happens. All that was needed was some background fabric and something to make centers for 6-1/2″ star blocks. I really wanted to make the centers as 4-patches using the bundle fabric, but there just wasn’t enough.
The strips of fabric are cut at 2″. Four of them create a 6-1/2″ block of color. This would have been much easier with straight cut quarter yards, but with enough fabric-stretching, the fat eights just made it.
There is a small background piece between (1″ finished), 3″ and a border around.
It is such a cheerful quilt, bringing joy to the heart. And it all started with just a few hearts!
This quilt started as an experiment with fat quarters. I had seen a few similar quilts and wanted to give it a try.
This version uses 9 fat quarters. Three prints and 6 solids. The quilt finishes at 40″ x 48″. Each block has a center cut at 4-1/2″ x 4-1/2″, some plain squares, and some created as hourglass blocks made of two squares starting at 5-1/2″ x 5-1/2″. The outside of the blocks is two rectangles 2-1/2″ x 4-1/2″ and two rectangles 2-1/2″ x 8-1/2″.
It went together quickly and is finished and delivered to a neighbor as a spring surprise. She seemed very pleased.
I acknowledge that the instructions aren’t a lot to go by. Feel free to ask questions. Enjoy!
Any quilt with 100 blocks is going to take a while, and this one did.
But, it was worth it! Every block uses a unique fabric for the “dash” and a unique fabric for the center. The backgrounds and sashings have some duplication, but all came from the scrap boxes. These blocks are based on 2-1/2″ squares, and the borders started at 1-1/2″, giving 7″( finished) blocks.
I love the alternating borders around each block.
And the pieced (not perfectly, but fun) sashing.
A tutorial for the block, in ANY SIZE coming soon. So, dust off that box of random squares, and get ready!
The kit and pattern came from the crazy quilter garage sale I found a while back. While it isn’t my typical style, it seemed a good challenge (and a great bargain at $10).
I immediately remembered why I don’t do a lot of these style blocks: BIAS EDGES. They are what they are and require special care and attention.
A skill I need to improve on it pressing. It is so important to success in these patterns.
That said, it is a finished product and worthy to be gifted (if the right person comes along) or donated at the end of the year.
There were around 200 4-patch blocks, most alternating background/print, and some, what I would call, mixed patches. All came together in a box.
They had issues–mostly inconsistent seam allowance. And some people might have considered them dated.
But there was something interesting about them. So, first things first–Square Up. I chose 3-1/2″.
Alone they weren’t enough to make a sizable quilt, so I explored a number of different options for the alternating squares–too light, too dark, too dull, too print-y. None were quite right. Then, I remembered, when struggling with colors, there are a few that are almost always the right answer. They brighten, connect, and go with nearly everything. GOLD is one of them.
(PS–a good solid aqua/turquoise is another, but we’ll cover that another day).
Right away things started to look better. The layout I settled on was to set the blocks on point with the light/background squares always facing the same direction. This gives a sort of waterfall effect, creating stability and movement at the same time. The mixed patches are scattered throughout for extra interest.
The final top is approximately 59″ x 76″ and has a warm, welcoming feel. Much like fall.
MINI TUTORIAL (in case you want to make something similar from scratch:
MATERIALS:
2″ scrappy squares–around 800
background fabric–2-1/2 yards
binding–1/2 yard
backing–3-1/2 yards
DIRECTIONS:
Create 192 4-patch blocks. They should measure 3-1/2″ square
Cut the background fabric as follows: 165 3-1/2″ squares (alternating blocks), 13 5-1/2″ squares cut twice on diagonal (84 side setting triangles), 2 3″ squares cut once on diagonal (4 corner triangles), 7 3-1/2″ strips width of fabric (for border).
Lay out the 4-patches on point in a pleasing arrangement 12 blocks wide and 16 blocks high.
Add the 3-1/2″ background blocks, setting triangles and corner triangles.
Assemble into strips along the diagonal lines, then join the strips together.
Should measure approximately 53-1/2″ x 69-1/2″.
Join the 3-1/2″ strips of background fabric together. Cut into two strips 3-1/2″ x 53-1/2″. Add these to the top and bottom of the quilt body. Cut the remaining into two strips 3-1/2″ x 76-1/2″. Add these to the left and right of the quilt body.
Ta-dah! a quilt top!
Layer, quilt and bind as you like.
This is very much a MINI-tutorial. I am happy to answer any questions you may have.
This project originally appears in the Online Quilt Magazine, a great resource for your quilting needs.
I love anything goes scrappy quilts for donation projects. You never know exactly how they will turn out.
A great pattern for this sort of quilt is the Potato Chip block. All you need is a big pile of scraps cut into 2-1/2″x4-1/2″ rectangles.
You can even use scrappy binding scraps to finish.
My husband has said that my quilts are energy efficient. I assumed he was referring to my use of scraps. Nope! He says they are energy efficient because no one needs a night light since they practically glow in the dark. I’m taking that as a compliment.
It started as a block. A LARGE block–25″. It was beautiful, and someone worked very hard on it. And abandoned it. And it was lonely.
What to do…
Well, I also “happened” to have (if you believe in coincidence) these leftovers someone shared with me. The colors worked. The strips weren’t very big and about 3/4″ across, finished. I cut them into 2″ wide sections and pieced those together.
Also, found this lovely yellow in my stash with just the right print on it. I love being lucky, don’t you?!
Around and around until there were 4 2″ (cut, 1-1/2″ finished) borders and it was about 37″ square.
This piece deserved more than just edge-to-edge quilting. So I gave it to Jennifer (everyone needs a longarm genius for a buddy) and she did her magic.
There were pencil marks from the original maker that started the quilting idea.
We selected thicker polyester batting to provide enough lift to really make the quilting POP!
And the finish is a treasure. Shout hooray–another quilt given a second chance!
NOTE: This post first appeared in Online Quilt Magazine. If you haven’t subscribed yet today is the day to do it.
There is the inspiration, which leads to an idea, which leads to all current projects being pushed to the side and…
Ta-dah! A quilt.
The beauty of it (in this case) is that, not including the sashing and borders, all pieces for the blocks start as a single size square. And it doesn’t matter what size that square is (as long as they are all the same size).
So, you might want to dash about your sewing room and gather up those stashed squares that you have been wanting to make something out of. This might be just the thing!